I have been working on this t-shirt quilt for almost a year now, although I've probably been thinking about it at least twice that long. I have been saving t-shirts for this project since the little guy started growing out of shirts -- about three years ago. I don't like to throw anything out that can be re-used in some way; in addition, t-shirts that the kids have worn are special because they have memories attached. Many of the shirts in this quilt were worn by both boys. Some were handmade by me and a couple were decorated by a cousin.
About a year ago I started cutting up these saved shirts and piecing them in to 12.5" blocks. I didn't use any kind of interfacing, although I know you are supposed to to keep the shirts from stretching as your are piecing and cutting. I wasn't really worried about wonkiness though. Since many of the baby and toddler shirt fronts were less than 12.5" square I sewed pieces to the sides and/or top and bottom to get them to 12.5." Up until a couple months ago I only had about a dozen of these blocks done since I haven't had much time for sewing since September. But in the last couple months I have had more sewing time and have been working on this quilt whenever I get a chance.
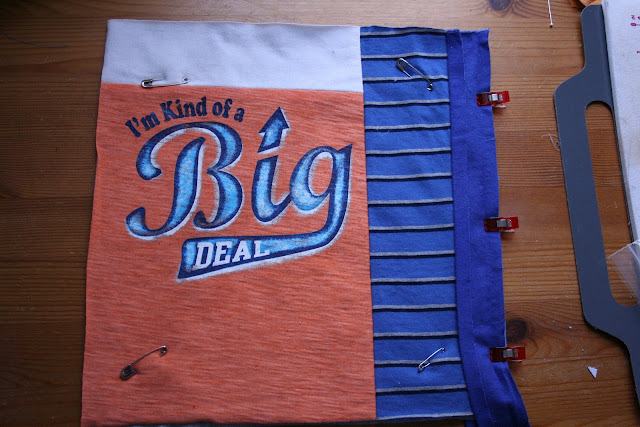
I sewed the quilt together using a quilt-as-you-go method because I was worried that the lack of interfacing would make the whole thing too unstable if I tried to sew the blocks up into one big quilt top. So, once I had my quilt blocks (I made 36), I layered each with a piece of fleece for the batting and a heather gray jersey knit (from a set of sheets) for the backing and trimmed them up together using a
12.5" ruler (affiliate link). I found that when I smoothed the quilt block over the fleece that it needed trimming again to get it to 12.5" (that is obviously due to the lack of interfacing). The t-shirt material tended to stick to the fleece a little bit which made the whole thing hold together pretty well, but I put four safety pins through all the layers in each block to make sure the sandwich stayed together and didn't shift too much.
Once I had all my block sandwiches trimmed up I made binding tape out of solid flannel using my
Clover 1-inch bias tape maker (affiliate link). I used flannel because I wanted it to feel soft and warm, like the t-shirts, but not have the stretch. I thought the feel of quilting cotton would be too much of a contrast with the t-shirts.
I then aligned the raw edge of one strip of binding tape to the right edge of one of my blocks, with the right side of the binding tape to the front of the block. I used another strip of binding tape on the back of the block with the right side of that strip facing the back of the block. I held the whole thing together with
Wonder clips (affiliate link).
I then sewed the binding tape on right along the crease (1/2" from the edge). I used long strips of the binding tape so that, as I got to the end of one block, I just slid another block in between the two strips of binding tape, making sure all the edges were aligned, and kept sewing.
After I finished sewing the binding tape to the right side of each block I cut the blocks apart and folded the binding tape from the back of the block out, so that the right side of that binding tape was now face down. I then put that on top of the next block which was face down, so that the right side of the back binding was against the back of the next block. I sewed along the back binding along the crease.
Then I flipped the second block so that it was face up and folded the front binding tape over the second block's left side raw edges.
I topstitched along the right side of the front binding tape, making sure the stitching from the back binding was covered. I used a bobbin thread that matched my backing fabric rather than my binding fabric because more often than not that stitching ended up on the backing fabric.
I continued piecing my blocks together this way until I had seven rows of blocks each.
I then pieced the rows together the same way I pieced the blocks together, making sure that my binding strips were at least as long as the row. At this point I realized I didn't have enough of the blue to complete the whole quilt, so I cut up some red and green to alternate with the blue for sewing the rows together. I actually love the way this turned out.
To complete the quilt I used a strip of binding tape made from navy blue flannel to bind the edges. I sewed it to the back first and then folded it over to the front and machine stitched it down.
And then I was done! A cozy soft quilt full of memories. The big kid has already claimed it as his own.
The quilt finished up at about 62.5" by 87.5." With this method of quilting as you go, you don't lose anything in the seam allowances since the blocks butt up against eachother under the binding strip. It is a generous twin size quilt and should last us a while. Maybe one of the kids will even take it to college!
I have a lot of t-shirts left and have plans for more quilts to use them up. I think my next project will be a denim-backed t-shirt picnic blanket!


